How to Set Up MLA Format in Google Docs

Students often need to format papers according to certain guidelines. Here is how to set up MLA Format in Google Docs.
Picture this—you’ve been assigned your first paper in college, and the professor says it needs to be formatted using the MLA format.
You immediately panic, because there’s no button to set up MLA formatting automatically in Google Docs. You can stop worrying—let us show you how to set up MLA format in Google Docs manually.
Why Do I Need MLA Formatting?
The Modern Language Association (MLA) established a format to make scholarly papers in language and literature more uniform and easier to read. This standard defines what sort of paper to use, the style of typeface, and how to format your writing and citations.
You can find all of the requirements for MLA formatting in the MLA Handbook, currently in its 9th edition. Most style handbooks available at your college bookstore will also offer the details you need.
If you properly follow the MLA format, you can rest assured your research paper will be easier to read and understand. The guidelines for citing your sources will also ensure there is no suspicion of plagiarism in your work.
The Basics of MLA Formatting
MLA format specifies how your essay should look when printed. Here are the basics you will need to follow.
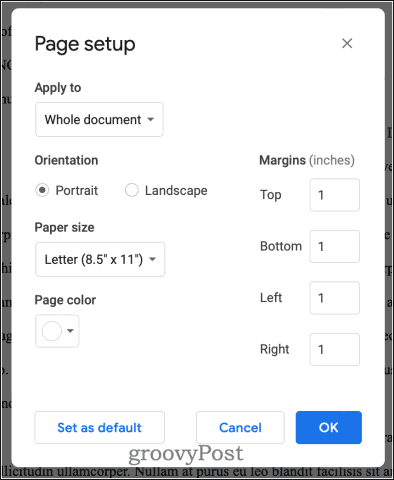
- Print your essay white, letter-sized (8.5 x 11”) paper.
- Set margins should be at one inch on all four sides.
- Double-space the text.
- Choose a font so that italics are easily distinguished from regular text.
- Times New Roman is typically preferred.
- Set the font size to 12 points.
- Center the title of the essay.
- Indent the first line of each paragraph half an inch from the left margin.
The Page setup menu should look like this after you click File > Page Setup and follow the formatting rules we’ve listed above.
Once these basics are taken care of, it’s time to set up your font, page header, title information, and line spacing.
Setting Up Your First Page in MLA Format in Google Docs
Follow these steps to set up your document for MLA format in Google Docs.
Configure the Formatting
- In the font drop-down, choose Times New Roman.
- Set the font size to 12 points.
- Under the line spacing icon, click Custom Spacing.
- Enter 2 in line spacing and 0 in the before and after paragraph spacing fields.


Adding Relevant Information
Next, you’ll type your name, your professor’s name, the course number, and the date on separate lines. Type the title of your essay in normal text, capitalizing the first letter of each word.
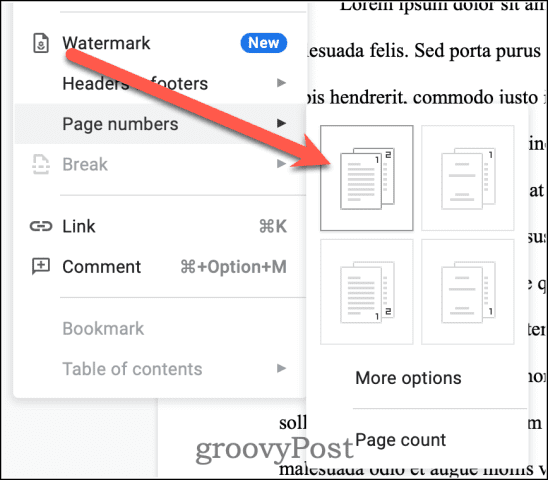
Each page of your essay should include a header with your last name and the page number. To do this:
- Double-click in the space above your name. The Header field will appear.
- Click the icon to align your text flush to the right margin.
- Type your last name and a space.
- Click Insert > Page Numbers.
- Choose the icon showing a page number in the corner of each page.

- Be sure Different first page is not checked.
- Finally, click back in the body of your document.
Your document should look like the image below at this point.
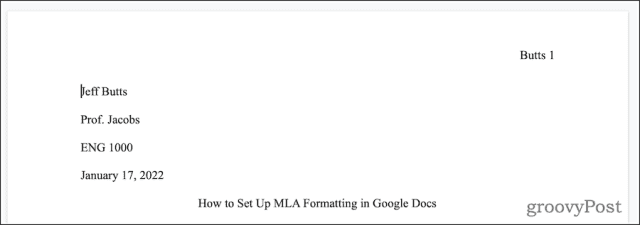
Next, press Enter/Return at the end of your title to begin a new line.
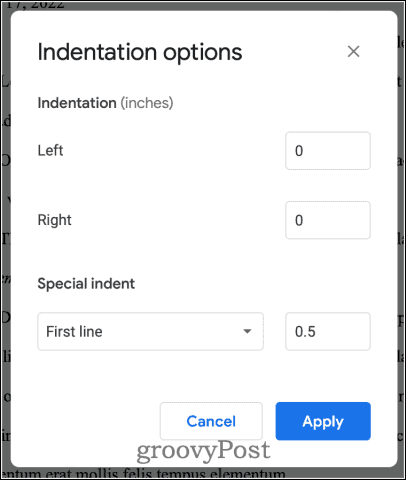
Inserting Indents
Now it’s time to set up the first line indent required by MLA format.
- Click Format > Align & Indent > Indentation options.
- In Special indent, choose First Line Indent.
- Type 0.5 in the field provided.
- Click Apply.

Once you’ve completed these steps, you can begin typing your essay.
Citing Your Sources According to MLA
When you quote or paraphrase another person’s writing or ideas, you need to give credit to that essay, article, book, or any other source. If you don’t, you are guilty of plagiarism, even if it’s unintentional. MLA provides specific guidance on how to properly credit your sources. The first step is called an in-text citation.
At the end of the quote or paraphrased information, before the period, place the author’s name and the page number where you found the information in parentheses. Your terminal punctuation, or period, goes after the closed parentheses. If you’ve already named the author within your sentence, you don’t need to include it again. Direct quotes will look like this:
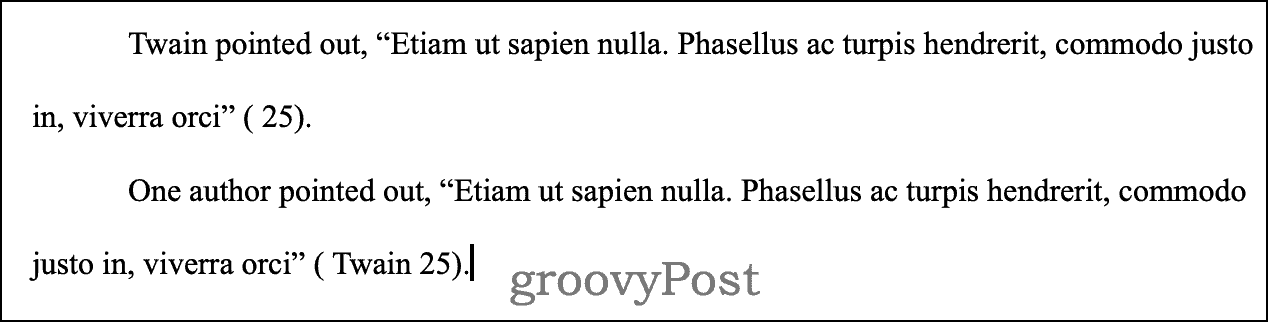
If you’ve paraphrased another person’s work, the in-text citation follows the same pattern. The difference is, you won’t have anything in quotation marks.
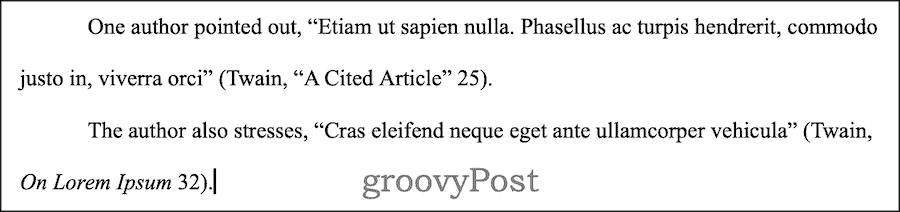
Should you need to quote or paraphrase text from different works by the same author, you should also include a shortened title of each text. The shortened titles for articles should be enclosed in quotation marks. On the other hand, shortened titles of books should be in italics. Reference this example to see how it should look.
Preparing Your Works Cited Page According to MLA Format in Google Docs
Every source you quote or paraphrase also needs to be listed on a Works Cited page. Here’s how to set that up.
- At the end of your essay, click Insert > Break > Page Break.
- Click the icon to center your text.
- Type Works Cited in regular text, as shown below, then press Enter/Return.
- Click the icon to align your text with the left margin.
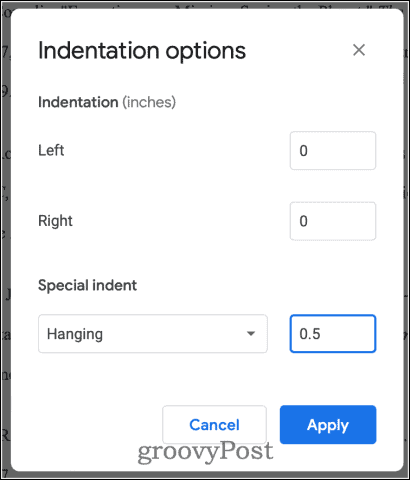
Next, you’ll set up what’s called a hanging indent. This means the second and succeeding lines of each paragraph will be indented.
- Click Format > Align & Indent > Indentation options.
- Under Special indent, choose Hanging.
- Enter 0.5 in the field provided.

Next, you will type your source information for each work you have referenced. Organize each one apathetically by the author’s last name. Do not press Enter/Return until you’ve typed all of the information for the source. The basic information you provide depends on what type of source it is. You should consult your style guide for more elaborate needs, such as anthologies, works with translators or editors, and so forth.
Books
Author. Title of book. City of publication, Publisher, Publication date.
If the book was published after 1900, if the publisher only has one office, or if the publisher is known in North America, you can omit the city of publication.
Here is an example of how this might look on your Works Cited page.
Newspaper or Magazine Articles
For articles from periodicals, such as magazines or newspapers, the format is somewhat different.
Author. “Title of Article.” Title of Periodical, Day Month Year, pages.
This will look like the following example.

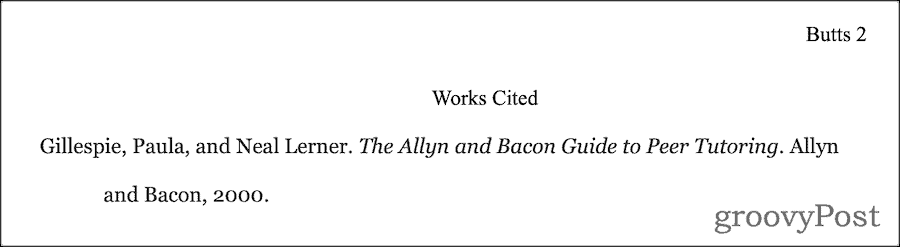
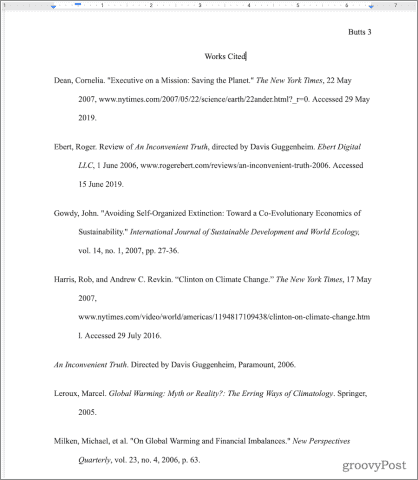
Your Finished Works Cited Page
After you’ve finished, your final Works Cited page might look something like this.
Another way to prepare your Works Cited page is to let Google Docs do the heavy lifting for you. The caveat here is that it may not follow the same edition of the MLA style guide as your professor requires.
Preparing to Submit Your Paper
Now that you’ve completed your paper, you should carefully proofread it and double-check formatting. If you are required to submit it through email or a website, you may want to export it to Microsoft Word format before sending it.
You may need only share your file directly from Google Docs. That’s easy to do if you follow our instructions, and also gives your peers or professor a way to comment on your work.